Advanced Photoshop: gloss contours made easy in this tutorial
We have just taken an in-depth look into many Photoshop Bevel and Emboss layer options. Now we are going to understand the details of the remaining bevel option: the so called Bevel Gloss Contour.
While bevel itself creates a bump or 3D-looking effect (similar to a button), Photoshop gloss contour controls the transition between the areas of shadows and highlights.
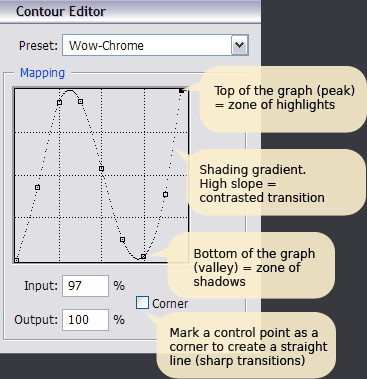
So the shape of the reflections that are depicted on the beveled surface is mainly the shape of the gloss contour curve itself.
This gloss contour graphic is easy to understand taking into account these 2 basic ideas:
- The top of the graphic (any peak of the gloss contour) is the zone of maximum highlights.
- The bottom of the gloss contour graphic (any valley of the curve) is the area of darkest shadows.
So the standard bevel used in most Photoshop buttons is a straight line: a soft gradient between shadows and highlights.
On the other hand, more complex gloss curves will render strong reflection effects, which are optimal to create your own metal chrome layer styles.
Just click on the gloss contour thumbnail to open the Gloss Contour Editor. You can draw your own gloss design this way: click to create new control points, or drag an existing curve point to a new position.
Now that you understand the secrets of Photoshop gloss, read on to find an easy way to create your own contour design experimenting with many predefined curves.

Click on the gloss contour shape to open the Photoshop gloss contour editor. Add or move control points to create your own custom gloss curve.
Photoshop gloss contour presets: add metal gloss to your chrome style

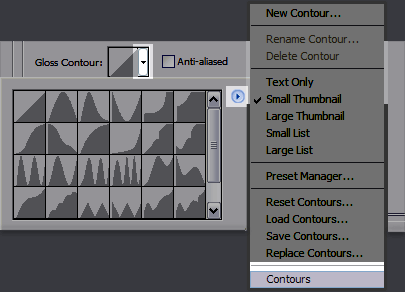
Click the drop down arrow next to the curve graph to select a different gloss contour curve from the preset curves of Adobe Photoshop. Nevertheless, the default group of gloss contour designs is rather small.
Let’s open a complete collection of useful predefined contour curves. Once you have expanded the drop down menu, click on the small right pointing arrow and load the Photoshop preset called "Contours". This way, you will activate a big group of predefined gloss curves.
A typical chrome metal gloss contour would be a wavy curve, like the previous gloss graph. Using such complex gloss effect in Photoshop would add several highlighted and shady areas in the very bevel slope, depicting the complex and distorted glossy reflections of the environment that define a piece of chrome or shining metal.
Once you have enabled the whole collection of Photoshop preset contours, you will rarely need to create any curve by hand. Experiment with the different gloss effects in Photoshop, as those contours may completely change the overall looking of the metallic layer style.
Now let’s learn the secrets of a similar option, the bevel and emboss contour.
Chrome with different gloss contours
![]()
A chrome effect with a cone-shaped gloss contour: a smooth brightness transition.
![]()
A chrome effect with gloss contour with 2 peaks: a more complex metallic reflection effect.
![]()
A chrome effect with a valley high gloss contour: it emphasizes the shining metallic highlights.

