
A Free Customizable Photoshop Dispersion Action by eserrano.com

Once you run the Photoshop actions of this collection you’ll see how complex dispersion effects are effortlessly applied to images, crushing surfaces and surrounding them in blazing energy effects. After the effect is applied, you’ll be in control of the generated layers of particles, light, dust, and ashes, for fine-tuning customization. Get them here, and read on to find how to extract the max out of this tool.
Downloading the Blazing Crush Photoshop Effect
This effect is a collection of Photoshop actions provided free of charge under a Creative Commons license, which essentially means that you can:
- Use this effect, remix, transform, and build upon it for any purpose, even commercially
- Share the effect in any medium or format
- As long as you give appropriate credit to the creator – Enrique Serrano Valle, linking to this page, http://eserrano.com/tutorials/free-photoshop-crush-action, provide a link to the license, and indicate if changes were made
See the license details below for more information:

Blazing Crush Effect by Enrique Serrano Valle is licensed under a Creative Commons Attribution 4.0 International License.
To download and install the effect:
- Click here to download the actions
- Extract the compressed actions file in a new folder
- Double-clicking the eserranocom-blazing-crush.atn file should install it in Photoshop. The new actions should be visible inside the Photoshop Window > Actions panel, in a eserranocom action group.
- Alternatively, open Window > Actions in Photoshop, click the triangle in the menu in the top right corner, select “Load Actions”, and choose the eserranocom-blazing-crush.atn file
- Or directly copy the .atn file inside the /Presets/Photoshop Actions/ folder under the main Photoshop installation directory (C:\Program Files\Adobe\[Photoshop Version] in a Windows computer, or /Applications/[Photoshop Version] if you’re using a Mac.
Running the Blazing Crush Effect Actions
Once the Actions have been installed and the eserranocom group of actions is visible inside the “Actions” Window, you’ll be ready to use the effect:
- Start with a flattened image containing a single Background layer. Images of sizes between 2000 and 3000 pixels render the best results.
- Run the Initial Setup action to create a “masking” layer. You can run an action by selecting its row in the Actions panel and then clicking the “Play” icon at the button of the Actions window.
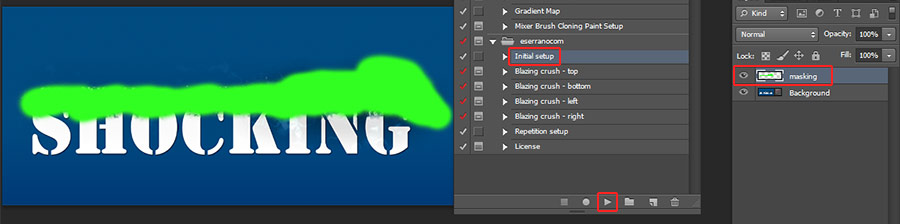
- Making sure that you have the “masking” layer selected, paint on this layer over the areas that you want to apply the action on. Using precise selections in this step, and/or images with transparency, render the best results (as undesired areas or the background won’t be merged with the effect.)
- Run the Blazing Crush action. Each one of the four variants disperses the generated particles in one direction, so choose the one that fits your needs – top, left, right or bottom
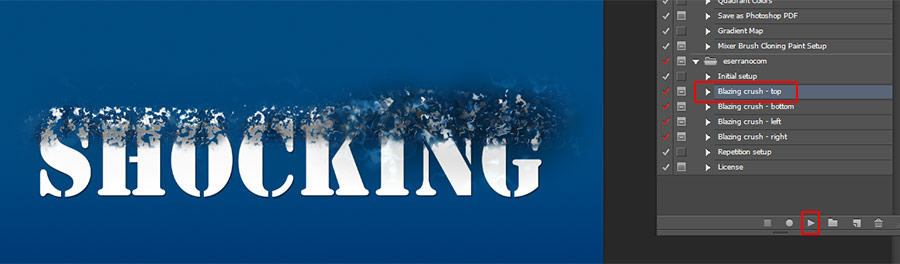
- This action contains unique customization features and it will prompt you to select the base crystallize size – bigger values provide more uniform colors while smaller ones can add more diversity and noise. For your first experiments, the default value will work just fine.
- It will then prompt you again to input the fragment crystalize size – smaller sizes will crush the underlying surface in smaller particles.
- These two prompts will be repeated one more time, for additional variety in the generated particles and additional customization capabilities.
- The action will eventually prompt you to drag the sliders moving the selection to a clear area, attempting to copy a “hollow” area into the crushed area for a more realistic dispersion. This is only necessary if your original image does not contain a transparent background. If the image is empty of clear background areas close to the crushed area, leave the displacement value as low (something between 0 to 5px) to prevent undesired artifacts, or hide the “hollow” layer group in the generated final effect.
- Once the action has been completed, and the generated layers have been customized to fit your needs (by masking layer groups, hiding specific effects, and adjusting the transparency and blending mode of others) you’d be ready to repeat the effect again. Run the “Repetition setup” action for this purpose, and repeat the process described in these instructions over the generated crushed and dispersed fragments for finer, more detailed and realistic dispersed particles in the image.

This action has been tested in Photoshop CS6 English version. However it has been designed with compatibility in mind, so it will likely run in other versions of Photoshop. Feel free to update it to the specific needs of your platform, following the details explained in the license area!
What’s next?
One of the strongest points of this Photoshop effect is its customization capabilities. The resulting effect will be presented as a layered collection of different effects, that can be tweaked for hyper-realistic results that meet specific cases. Here’s a list of the contained effect groups and some suggested customization capabilities:
- Lightning effects contains blazing energy bolts. The adjustment layer can be tweaked to change their color (they’re red lightning by default.) It is recommended to make this layer visible on the last repetition of the dispersion crushing effect.
- Flying particles generates crushed particles dispersed further away from the core. Hide it or reposition it in case the effect is too intense or disperses images too far.
- Flying incandescence generates ember-like fragments with a warmer glowing area that can also be customized. Remove to decrease blazing effects in favor of a crushed concrete look.
- Hollow effect copies the background in the dispersed image area for a realistic see-thru effect. Disable it if no hollow background is available, as discussed in the previous section. The “Hollow depth” effect layer adds a brighter contour to every particle edge, for an extra 3D feel, which can be too intense in very dark images, so disable in case your crushed area were black.
- Ash ember rock include effects that can turn the affected surface into a stone-skin, charred surface. They’re pretty intense but work pretty well over asphalt-like surfaces, rock-like surfaces, or even skin for a more radical effect.
- Dust adds a smaller set of dispersed dust particles in the edges of the crushed area of the image. Hide if it lightens or blurs your key areas too much, and enable when additional dynamic dispersion were needed.
- Particles is the core area of this effect, with the generated crushed and dispersed particles. Adjust the blending mode and the mask of this area to control the overall patterns and shapes of the generated particles
Hoping you enjoy using this effect as much as I enjoyed building it. Can’t wait to see your creative work!