Editing advanced Photoshop layer options: Layer Style Blending Options
Here is where the funny part begins: start creating your own customized layer styles by directly editing layer options in Photoshop.
Now let’s open the layer blending options by double clicking the layer row in the Photoshop layers window.
It is easier to start with a predefined layer style to create a custom chrome metal effect, and then customize the advanced layer options. So make sure you target layer has a chrome layer style applied by clicking on a layer style icon on the Photoshop styles window, or in the layer style window in the first tab called "Styles".
One of the most important sections of the layer blending options is the so called bevel and emboss because it controls most of the shining 3D effects of the chrome style.
Select the bevel and emboss option and read on to learn how to tweak advanced blending options.

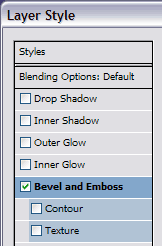
Open layer style options double-clicking the target layer, and select "bevel and emboss" to edit advanced blending options.
Photoshop layer style options: advanced bevel and emboss structure
The first half of the Photoshop bevel and emboss blending options is the Structure. The structure controls the main look of the bevel effect: the amount of the 3D bump and the overall technique used to create the 3D effect. Let’s take a closer look at these structure options:

As we are trying to create a metallic chrome effect in Photoshop, the most appropriate bevel structure Style is Inner Bevel.
The inner bevel creates a soft 3D bevel inside the shape. On the other hand, the remaining bevel styles focus on creating bevel effects on the outer edge of the shape. So these other bevel styles are good to encase a shape on a container with a 3D effect. But the inner bevel is the best option for a standalone piece of metal.
Smooth metallic surfaces work great with metallic reflection effects. That’s why we will mainly use the Smooth Technique with Photoshop bevel to render chrome surfaces. The effects achieved with Chisel Hard and Chisel Soft techniques are usually too sharp, creating a rather unreal and stark lighting transition.
The Depth option looks nearly as the intensity or amount of the Photoshop bevel effect. A high depth value will create more intense and complex reflection effects on the chrome surface.
The Size value acts like the Photoshop scale effect option, but focusing only on this bevel and emboss effect. Avoid using very small values (that concentrate the effect too much on the edges) or very high values (that will render over-the-top chrome reflection effects).
Finally, adjust the Photoshop Soften option to blur the transition of light and shade of this 3D bevel effect. Select a soften value that will render a realistic shading gradient, without blurring too much the effect.
![]()
A Photoshop chrome style with default layer options. The metallic 3D effects and chrome reflections are mainly achieved by activating the bevel and emboss options.
Bevel Depth option
![]()
Bevel depth value = 1%. Very subtle bevel effect.
![]()
Bevel depth value = 49%. Strong metallic reflections.
![]()
Bevel depth value = 234%. High and sharp bevel in the center of this piece of chrome.
Bevel Soften option
![]()
Soften effect = 5 px. Softened light and shade gradient.
![]()
Soften effect = 15 px. The shading of the layer is strongly blurred.
Advanced bevel and emboss shading options in Photoshop layer styles
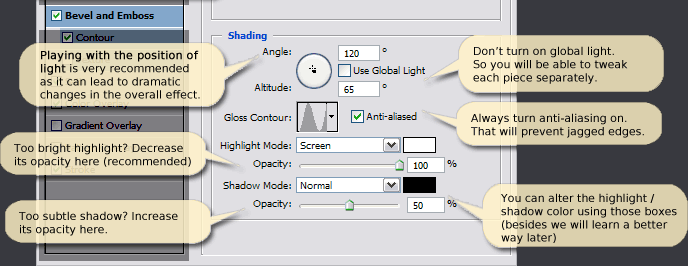
The second part of the bevel blending options is Shading. As its name suggests, "shading" controls the light and shade effects of the Photoshop bevel. You can adjust the intensity, color and shape of the lighting and shading effects through the options in the shading section, enabling you to completely tweak the appearance of the 3D bevel in a similar way to the structure options. Let’s see some shading option tricks:

Once you defined a 3D bevel shape tweaking the bevel structure options, you can adjust the position of a virtual source of light. It is important to disable the global light setting by unchecking the checkbox. That way, you will be able to tweak the shading options of each piece individually.
It’s also advisable to experiment by dragging the crosshair marker on the light angle and altitude circle. That’s an intuitive way of placing the light source for your gradient effects. Take into account that small changes on the light position may lead to huge changes on the overall look of your Photoshop bevel effect.
The gloss contour option is so important that we will take a closer look at it in the gloss contour section of the tutorial. By now, just remember to activate the anti-alias option to prevent jagged edges in the bevel shading effects.
You can adjust the shading and highlight colors by selecting a new color in the color picker option boxes, but we will learn a much more professional way to adjust light and shade bevel colors in the coloring the style step of the tutorial.
You will need to add a lot of random looking reflections in each layer effects in order to make the design look like a realistic chrome effect. These reflections are mostly depicted using the bevel shading options (together with the satin effect, explained later in this tutorial).
To increase the amount of the chrome reflections effect in the current layer so far, it is advisable to raise the shadow opacity bar to strengthen the intensity of the shadows and the overall contrast of the piece of chrome. You can also set the shadow blending mode to Multiply to increase the contrast.
On the other hand, the strength of the highlighted areas is usually too intense and may render your layer effect a little bit burnt or overexposed. So it is often a good idea to lower the highlight opacity to make the chrome effect look more realistic.
Combine a strong shadow with a very low highlight layer opacity and you will create dark chrome metals or obsidian interfaces.
Congratulations! You have started creating your own layer style just by customizing a few blending options. Now let’s move on to the next step: creating a custom gloss effect.
Bevel lighting: 3D light position

Drag the light angle and altitude crosshair to create a lot of different layer effects. It’s a quick and interesting way of experimenting with the overall bevel effect.
![]()
Light angle = 117º. Light altitude = 32º.
![]()
Light angle = 180º. Light altitude = 0º.
![]()
Light angle = -60º. Light altitude = 48º.
![]()
Light angle = -21º. Light altitude = 42º.
Bevel shadow and highlight
![]()
Highlight opacity = 75%
Shadow opacity = 90%
![]()
Highlight opacity = 23%
Shadow opacity = 100%

