
Photoshop scale effect: easy style tweaking
If you apply a chrome layer style in Photoshop by directly clicking on the style icon, you will sometimes notice that the achieved results aren’t optimal. There are 2 typical situations:
- The metal texture of the layer style seems too flat, with only details concentrated in the layer edges.
- The layer style is saturated with reflections, which are too big, intense and unreal.
In fact, it’s all due to a scale problem: if the configuration values of the layer style effects are too small or too big for the target image, you will get too subtle or over-the-top results.
Fortunately, there is a quick and easy solution for this problem: Photoshop Scale Effect option.
From now on, the first step after applying a Photoshop layer style should be tweaking the scale of the effects. You would never be sure if a layer style is appropriate or not for your design till you have adjusted the size of the layer effects.
Effect scale = 50% The effects are too concentrated near the edges while the rest of the surface looks too flat.
![]()
Effect scale = 175% Interesting effect, but the reflections are over-the-top and the resulting chrome metal is rather unreal.
![]()
Effect scale = 100% Optimal layer effects size for this piece of chrome.
Adjusting the optimal effect size with Photoshop scale effect
The idea is to adjust the scale of the effects inside the Photoshop layer style. There is an optimal effect size for each layer, depending on the scale of the drawn areas inside such Photoshop layer.
Scaling effects in Photoshop is just this easy: right click the layer effects icon of the target layer and choose the "Scale Effects…" option.
The Scale Layer Effects window will pop-up. Drag the effect scale slider to tweak the effects size of the layer style applied to the current layer till you are satisfied with the results achieved.
Different amount of effects may dramatically change the look and feel of the results. Even default Photoshop styles can lead to surprising results when tweaking their scale appropriately. Keep the Preview checkbox active to easily experiment with immediate feedback.
Remember to keep each piece of your design in a different layer. That way, you will separate the scale amount of each layer style, according to the size of the target images.
If you mix pieces of different sizes in the same Photoshop layer, you won’t be able to easily optimize the scale of each effect. Don’t worry about the image size: we will optimize that later.
Remember: always experiment dragging the scale effect slider! Now let’s take an in-depth look at Photoshop layer options in the next step of the tutorial.
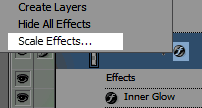
Right click on the layer effects icon of the desired layer and select "Scale Effects".
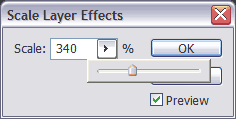
Drag the effect scale slider with preview active to experiment till the metal layer style looks OK.
![]()
The look and feel of a default Photoshop green gel style changes a lot when tweaking the scale of the effect.