
How to design the main shape of an interface with Photoshop
Now that we have just learnt how to create shapes for metallic edges, it’s time to design the main shape to use as the main layout of an interface.
These metallic Photoshop styles are great to create modern looking interfaces. The first idea is to design a big shape to use as the main interface.
I would use a big square shape as the starting point for a basic web interface, with round corners that will create an interesting metallic effect when used with a chrome style.
Remember what I said in this tutorial about big shapes? These kind of shapes tend to look rather dull with chrome styles applied, because the main chrome effects appear only near the edges (due to the bevel, contour, stroke and glow effects).
The key idea to make this main shape more interesting is to erase certain parts and create empty spaces.
As we design thinner parts and create more edges in the inner hollows, more metallic and chrome reflections will show up inside this basic interface.
Try to create empty areas, separators and hollows according to the design of the web interface, leaving empty spaces for each section defined inside this main interface design.
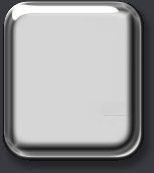
Big shapes with metallic styles are rather dull. Don’t worry: we will fix that erasing parts of the interface.
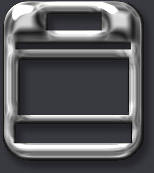
Draw the sections of the main interface erasing specific areas, thus reinforcing the chrome effects of the design.
Photoshop techniques to make the main web interface shape design more interesting
There are several ways to create new empty spaces inside the main shape to increase the chrome reflection effect of the applied metallic Photoshop style.
As we did before in this tutorial to define the base shapes, you can make a selection with the Marquee Tool or the Elliptical Marquee Tool to erase interface zones as well. Remove the selected areas pressing DEL. This is one of the best options to define straight and square sections inside the interface.
Another intuitive way to create empty spaces is to use Photoshop’s Eraser Tool (shortcut: E). As you erase parts of the web interface you will reveal chrome effects with an immediate feedback.
My suggestion is to use a hard brush as eraser to avoid blurred contours and keep the edges of the interface well defined and focused.
Even a small sized brush can be used to create a separator line. That simple change would reveal a lot of new and interesting chrome reflections in which once was a flat and dull interface area.
Remember: the nearer the shape edges, the more intense the metallic reflection effects become.
Now that we created the main shape and some metallic looking edges, it’s time to begin the funny part of the tutorial: start designing your own Photoshop style. Go on to the next step, scaling Photoshop effects to learn how to quickly perform style adjustments.

Configuring a hard eraser brush in Photoshop
Erasing parts of the interface will bring to life interesting reflections. Let your metallic web interface design shine!