
Photoshop Duplicate Layer: a tutorial to create interface elements
In the previous step of this tutorial we saved the images with the metal textures that will form the Photoshop chrome interface. Now we are ready to work with some basic pieces to create even more chrome looking effects and metal interface elements.
From now on, it is important to work with pixels (and not with layer styles). That’s how many new Photoshop tools become available to create new chrome interface elements from our basic pieces:
- We can duplicate layers keeping a small and fast file.
- We can directly draw or erase parts of our metallic pieces, without altering or recalculating the metal style rendered.
Let’s start with Photoshop duplicate layer options. The first step to develop many metal looking interfaces from the basic chrome elements that you already have starts duplicating your current layers (or parts of those layers). Then we will modify and tweak these pieces to generate more metallic images.
- To duplicate a whole layer in Photoshop, just drag the layer (on the so called layers window) to the new layer icon at the bottom.
- If you want Photoshop to duplicate a selection, use the Layer > New > Layer via Copy option (shortcut: CTRL + J).
As the metal effects of the duplicated layers are made of pixels (not Photoshop styles), you can paint or erase part of these duplicated elements to generate many more pieces of the interface while keeping the metal effects achieved.
Add or remove things to the same layer: the metal style won’t be distorted. Just experiment creating more metallic interface pieces from your exported basic interface!
Keep reading to find how you could use the Free Transform Tool to create even more interesting interface sections.
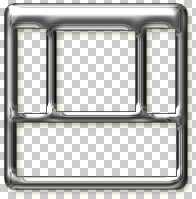
Start from your main interface component, saved as a flat image with transparency.
![]()
If we cut the top of the interface while it had a layer style applied, the lower border would change as the style is redrawn.
![]()
On the contrary, we can cut the top bar of the exported TIFF image with no metal style alteration.
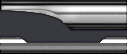
Duplicate parts of the interface, and erase areas to create more pieces of metal.
Photoshop Free Transform: adding 3D and perspective in Photoshop
We can directly tweak the duplicated interface shapes drawing by hand, filling selections or using the Brush tool. But we could also take advantage of the powerful Photoshop Free Transform Tool to create as many interesting variations as possible from our basic chrome interface.
To use the Transform Tool just select the desired layer in the layers window, and press the shortcut CTRL + T.
Even basic free transformations as scale and rotate are a very interesting way of combining your duplicated pieces.
There are many free transform operations that will be pretty useful to create modern chrome interfaces from the basic pieces. Here are some few tricks.
To Scale in Photoshop while in Free Transform mode, click and drag from a scale handler (where the mouse pointer turns into a straight double headed arrow).
![]()
Hold SHIFT for proportional scaling, and hold ALT if you want to scale from the center.
To Rotate in Free Transform, click and drag from outside the shape (where the pointer turns into a curved double headed arrow). Hold SHIFT while dragging to restrict the rotation increments to 15º.
![]()
You can also Distort using Free Transform: hold CTRL and then click and drag any of the scale handlers.
![]()
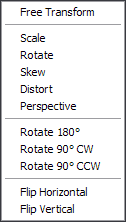
Remember that a right click in any part while in Free Transform mode will open a new menu where you can select to which type of Photoshop transformation (scale, rotate, perspective, etc.) you want to restrict the free transform operations.
You can select other rotation and Flip operations from this contextual transform menu as well.
Using the Free Transform contextual menu, we are going to restrict the transformations to Perspective only. Using this kind of 3D transform and perspective in Photoshop we can sharpen the pieces of interface to add more depth and tridimensional effects. In fact is one of the best ways to tweak your interface elements with a 3D flavour!
Once again, experiment! You would be surprised by the huge amount of different and interesting pieces of metallic chrome that you could add to your main interface just by "free transforming" with Photoshop the duplicated layers.
Right click when free transform is active to open the contextual menu. You can "Flip" the edited image, or restrict to the useful "Perspective" transform: add some 3D!
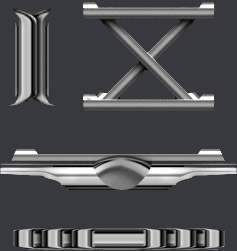
Don’t underestimate the power of Free Transform in Photoshop: these are a few examples of pieces of a metallic chrome tech interface made duplicating layers and free transforming them.