
Lighting and Shading in Photoshop tutorial: brushing shining effects
It’s time for the final adjustments of your metallic effects. Let’s go beyond the edges of the main metallic shapes: create an effect of light glow or light bloom. The idea is to brush a shining reflection like chrome, similar to the special glowing effects used by the 3D shaders.
First of all, keeping your shading and lighting effects in a new layer each is a good idea. This way, you can control the blending mode of the layer, as well as the layer opacity, thus adjusting the intensity of the extra brushed shadows and highlights. Use the shortcut Ctrl + Shift + N to create a new layer in Photoshop.
Lighting
Let’s start with the lighting and highlights. To create a real looking metal effect in Photoshop, you have brush a glowing aura near the spots of maximum highlight. That’s nearly how the metallic glow and bloom effects work.
To brush a shining edge effect, select the Photoshop Brush Tool (shortcut: B) and pick a big and soft brush through the brush menu or by right clicking anywhere on the canvas while you have a brush selected.
Hold Shift while brushing to create horizontal and vertical strokes. Press Shift + Click to brush straight lines. That’s a good idea to remark the shining edges of metallical pieces with a precise and industrial look.
Set the blending mode of the layer with these lighting effects to Screen. Screen increases the light value of the layers below, so it acts as a lighting source, always making the underlying image brighter. That’s why screen is the best blending mode to create highlight effects in Photoshop.
The most appropriate color to create metallic highlight effects should be nearly white. Take into account that darker colors haven’t nearly any affect in screen mode. Nevertheless, pure white may be too intense, leading to an overexposed result that may not admit further color adjustments. If your source of lighting has any tone, you can add a little bit of extra color and saturation to your layer of highlights (such as a soft yellow for a sunlit metal, and so on).
Keep you lighting and shading effects in different layers, so you can use appropriate Photoshop blending modes and opacity adjustments.
Choose a big, soft (0% hardness) brush to create lighting effects.
Set the layer with highlights in screen mode to brush light bloom effects.
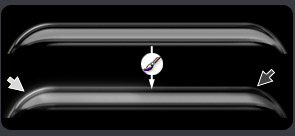
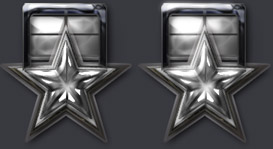
Directly brush your lighting effects on your piece of metallic interface. In this example, a highlight glow has been added on the left, and the shading has been increased on the right.
Shading
You can use a similar technique to increase the strength of the shading effects. Select a soft brush and start painting on those dark areas whose contrast you want to increase.
I would pick a slightly harder and bigger brush than the one used for the lighting effects, with a dark grey color to increase the strength of the shadows.
The blending mode of this layer used for shading purposes should be set to Multiply. The multiply mode always darkens the underlying layers by mixing them with the brushed color. In fact, multiply is just the opposite of screen (that’s why the screen blending mode was formerly known as "divide" in older Photoshop versions, as it is actually the inverse operation of multiply).
Use the multiply blending mode in the layer with the shadows to add depth and contrast.
Now let’s see a nearly automated procedure to create light glow effects, and a trick to make the metallic lighting effects more realistic.
Make more realistic lighting and shading in Photoshop: create a light bloom and smudge the shining edges
Automatic light bloom in Photoshop
Although brushing by hand is a very flexible way to add more lighting and shading effects to your image, it depends somehow on your drawing skills, and may be a little difficult at first.
So here is a nearly automatic procedure to create light bloom effects in Photoshop:
- Select all the highlights in the image using Select > Color Range… > Highlights. That will automatically select the most bright parts of your image.
- Duplicate in a new layer all these areas with the highest lighting value in a new layer by pressing the shortcut CTRL + J (new layer via copy).
- Set the Photoshop blending mode of this layer of the light bloom effect to Screen. As we saw before in this tutorial step, the screen blending mode will increase the brightness of every layer below this one, acting like a virtual lighting source.
- Use Photoshop Gaussian Blur Filter to create soft glowing borders and a smooth transition like a light aura or halo. This blurred light bloom is a much realistic effect than an artificial highlight with sharp borders.
- Adjust the layer opacity till the effect feels like a realistic metal glow, without overexposed lighting.
Follow this little tutorial and you will never mistake creating a simple yet effective metal glow effect. In fact, this automated procedure is a good starting point for more advanced bloom effects. Once you have defined a basic glow, brush or erase glowing areas to tweak the effect.
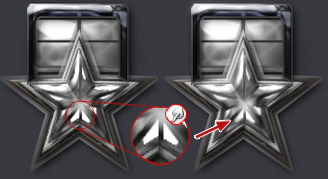
An image of a metallic star before and after adding the duplicated blurred highlights in screen mode: an easy way to create a light bloom effect in Photoshop.
Automatically selecting the highlight color range with Photoshop.
Lighting trick: smudge realistic metal glows
As we have taken as a starting point for this metallic glow a chrome metal style developed in this tutorial, you will often find that the lighting effects automatically generated with Photoshop bevel, emboss and glow contour doesn’t blend perfectly on the metallic background.
This is mainly caused because the transitions of light and shade are usually too sharp and stark. You could try to correct them by adjusting the smooth value of the bevel effect, applying a blur filter to a selection, or even brushing by hand the whole shining edge. But all these methods are rather difficult and time consuming.
Fortunately, here is a simple trick to adjust by hand the final details for maximum realism of the metallic effect. Use the Photoshop Smudge Tool (shortcut: R) to create smoother lighting and shading gradients.
This lighting correction technique is pretty simple: just smudge those borders of glowing reflections that seem too hard, sharp and artificial till they blend smoothly into the background reflections of the chrome metal.
Use Photoshop Smudge Tool to create a more smooth and realistic glow and lighting transition in the metallic shining areas.
Ok, now let’s move on to advanced Photoshop contrast adjustments with levels and curves in the next step of this tutorial!