How to save Photoshop layer styles
In the previous sections of this tutorial you have learnt how to create a custom Photoshop layer style with metal chrome effects.
Now it’s time to store the new style. Save a new Photoshop layer style as you would save Photoshop actions and scripts: just select the "Create New" option of the related menu, name the new preset, and you’re done.
Follow these detailed steps for saving a Photoshop style:
First of all, check that the active layer on your layers window is the one with the style to be saved (just single click the desired layer).
Then you can use either of these 2 Photoshop menus to save the selected custom layer style:
— The Styles Window (Windows > Styles).
- Click the right pointing arrow on the top right corner.
- Select "New Style…"
- Alternatively, you may click the "Create New Style" icon.
— The Layer Style Window (double click the layer).
- Click the first tab called "Styles".
- Click the right pointing arrow and select the New Style option.
- Or you may directly Click the "New Style…" button
Now just type a descriptive name to save your new style.
Make sure that you checked the include layer effects option, or your advanced layer options won’t be saved.
On the contrary, the include layer blending options checkbox is not so important, because most metal layer styles will be used in Photoshop’s default blend mode (normal with 100% opacity).
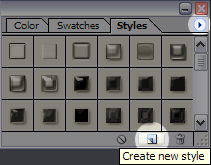
Saving a style from the Photoshop styles window selecting the "Create New Style" options.
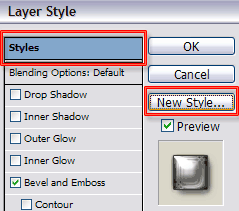
Or save the new layer style from the Photoshop Layer Style Options window clicking "Create New Style".
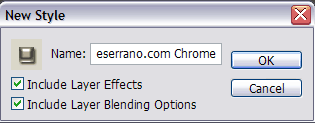
Give a new name to your style to save it.
Every time you stumble upon a layer style that you like, save your custom layer style! Remember that you can quickly reuse saved styles, applying powerful Photoshop effects with a single click.
Now read on to see the details about how to install styles in Photoshop, so you can save groups of styles (as presets) and install my free metallic styles or even share your own Photoshop styles!
How to install Photoshop styles: install Photoshop presets saved on another computer
If you plan to save a group of styles you need to create a new style preset following these steps:
- Click the right pointing arrow at the upper right corner of the Styles Window.
- Open the Styles Preset Manager.
- Select the styles you wish to save inside the preset by CTRL + clicking the style thumbs.
- Click the Save Set… button in the preset manager.
- Name the Photoshop preset (.asl file) and save it into your hard disk.
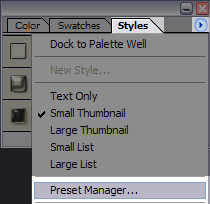
Save a group of styles as a preset with the Styles Preset Manager.
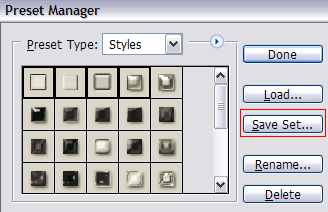
Select the styles to save in the preset and click the Save Set button.
The steps to install new layer style presets in Photoshop are similar to those steps to Install brushes. Photoshop stores all the presets in the following directory:
Photoshop installation folder \ Presets
The name of the subfolders is descriptive enough. While a new brush preset would be installed in Photoshop "Brushes" folder, the custom styles preset is saved inside the "Styles" subfolder:
Photoshop installation folder \ Presets \ Styles \
Install the .asl style file inside such folder (just by pasting the file there):
Photoshop \ Presets \ Styles \ my Saved Style Preset Name.asl
If Photoshop doesn’t recognize the preset, just restart Photoshop. And that’s how you would install my free chrome styles. You can even distribute your own sets of saved Photoshop styles copying the Photoshop .asl files.
Now that you know how to install Photoshop styles and save your progress, let’s create something useful using custom styles. Next tutorial step: combine layers to improve the speed of Photoshop.

