Adobe Photoshop performance optimization: tricks to merge layer styles
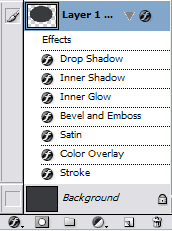
At this point of the tutorial, you probably have already noticed that Photoshop layer styles are heavy. If you keep using complex layer styles, you will find that Photoshop performance drops: the whole program slows down.
Editing shapes or blending options of layers with many advanced style options applied can be a very time consuming task with an unresponsive interface.
Fortunately, there is a simple trick to optimize Photoshop response time and speed up your workflow. The idea is to merge Photoshop layers and flatten the image as much as possible once you have completely defined your pieces of metal.
The key is to save the resulting image pixels and get rid of the layer style. Once you have achieved a cool looking chrome effect thanks to your Photoshop layer style, there is no need to keep it. Export the results, optimize the image layers and remove any complex style.
So, why would you keep using a heavy layer style when you can combine the layers and rasterize the effects? If you really don’t have to edit the Photoshop style options again, export and merge your images: free Photoshop from these processor intensive tasks.


A complex layer style will have a negative impact on Adobe Photoshop performance

Merge the layers, export the image and get rid of layer styles: same image quality with optimized Photoshop performance
The performance improvement of these optimization tricks provides the following benefits:
- Immediate visual feedback when changing layer blending options.
- Faster Photoshop .PSD file opening times.
- Smooth drag of layers with Photoshop styles.
- Quick direct paint on the layer with no style recalculating.
Keep reading to find the best way of merging and exporting your style layers optimized, but with no loss of quality.
Save image transparency and layers with styles without losing quality in Photoshop
The standard sequence to merge all the layer styles on the image and combine the layers with custom styles in a WYSIWYG way (what you see is what you get) would be as follows:
- Export the image using Photoshop save as… command.
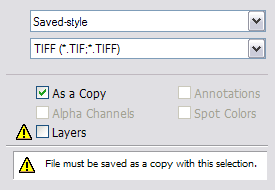
- Select a format that keeps transparency and adds no compression with loss of image quality, such as another .PSD or .TIFF file formats.
- Save the image as a copy, discarding layers and keeping transparency.
The quickest sequence to export only a piece or part with the layer style applied, (and without losing quality, as you see it on your screen), is as follows:
- Create a selection of which you want to export (either with a selection tool like Marquee (M) or by CTRL + Left Clicking the layer thumbnail).
- Make sure that your active layer is a visible (non-hidden) Photoshop layer, and that your .PSD file contains more that one single background layer.
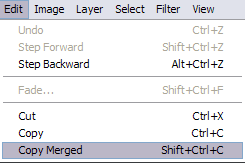
- Use the Copy Merged option (shortcut: CTRL + SHIFT + C) to copy the selection as you are seeing it (that is, it will copy the image layers as if they were merged, not only the elements on the currently selected layer, and without actually merging any layer: the source file remains intact).
- You can Paste the contents of your clipboard with the merged selection in a new layer (shortcut: CTRL + V).
- If you want to store the merged layers in a different file, create a new Photoshop document (CTRL + N) with the dimension of your clipboard and paste the merged objects (CTRL + V).

Use Photoshop "save as" option to save an image copy, keeping transparency but with all image layers merged.


You can use Photoshop "copy merged" option to save only the selected area while keeping the Photoshop source file unaltered.
Select the technique that you prefer according to which elements you want to merge and save. Optimize your time as you optimize your images.
And now let’s head to learn the secrets of the powerful Photoshop free transform tool to create many metal looking pieces from a simple starting point.

