
Photoshop tutorial: how to stroke borders in Photoshop with metal effects
A metal effect can be full of complex reflections, which could make difficult to distinguish the borders of the main shapes.
That’s why Photoshop stroke effect may come in handy. Using stroke in your layer style allows you to remark the border of a metallic style.
Adding stroke effects in Photoshop as part of your custom layer style is very easy. Just select the "Stroke" tab from your Photoshop layer style options, at the end of the effect list.
You can adjust the color of the stroke, as well as the blending mode and opacity, which really gives you a lot of choices to define the border of your custom style.
If you want to create just a subtle remark of the metallic border, use these stroke configuration settings:
- Stroke inside the border of your piece of metal, so you won’t alter the edges of your original shape.
- Use some transparency with the stroke, so it will blend with the current metal effect.
- Set the Photoshop blending mode of the stroke effect to multiply to darken the edges.
- Choose a middle gray as stroke color, as it will blend seamlessly with most metals.
Now let’s see some tricks to use a metal gradient as the border stroke.
Use Photoshop stroke effect to remark the borders of pieces of metal in a subtle way.
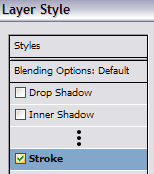
Enable stroke inside Photoshop layer style.
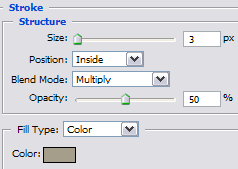
Configure these stroke values for a subtle metal border remark.
Photoshop stroke effect: tips to create metal borders with gradients
You can change the Fill Type inside the stroke options. Selecting a gradient as the stroke fill type you will be able to create a border with intense reflection effects, that will match the very style of the inner metal.
You don’t have to create a metal-looking gradient by hand. An easy trick is to take advantage of some useful predefined gradients to create a new metal-looking border. Enable the Photoshop Metals gradient preset by clicking on the drop down arrow, then on the right-pointing arrow, and then selecting "Metals".
My favourite gradient from all the Metals preset is the so called "Silver", as it seamlessly blends with most chrome styles. You just need to tweak the direction of the gradient to make it coherent with your main light sources.
If you really want to create a strong metal border, select a thick stroke size, with full opacity, and place it outside the edge of the shape.
Another interesting use of the stroke effect is to embed the metal shape in the background. The trick is to use a metal gradient with Inverse gradient direction respect of the main shading direction. That’s the way to create a 3D effect and make the main piece of metal encased in the border, thanks to the stroke depth effect of the opposing gradients.
Congratulations! You have learnt all the techniques to create your custom metal style. Now let’s save the Photoshop layer style to use it whenever you need it.
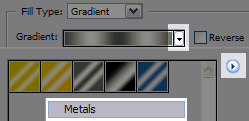
Open the Photoshop metal gradients collection: they are very useful to stroke your borders with a metallic effect.
![]()
The silver gradient effect works great as a border stroke. Increase the stroke width if you want to remark the borders even more.
![]()
Use an outer stroke to embed the piece of metal in the background. Use a gradient with opposite light source direction too.